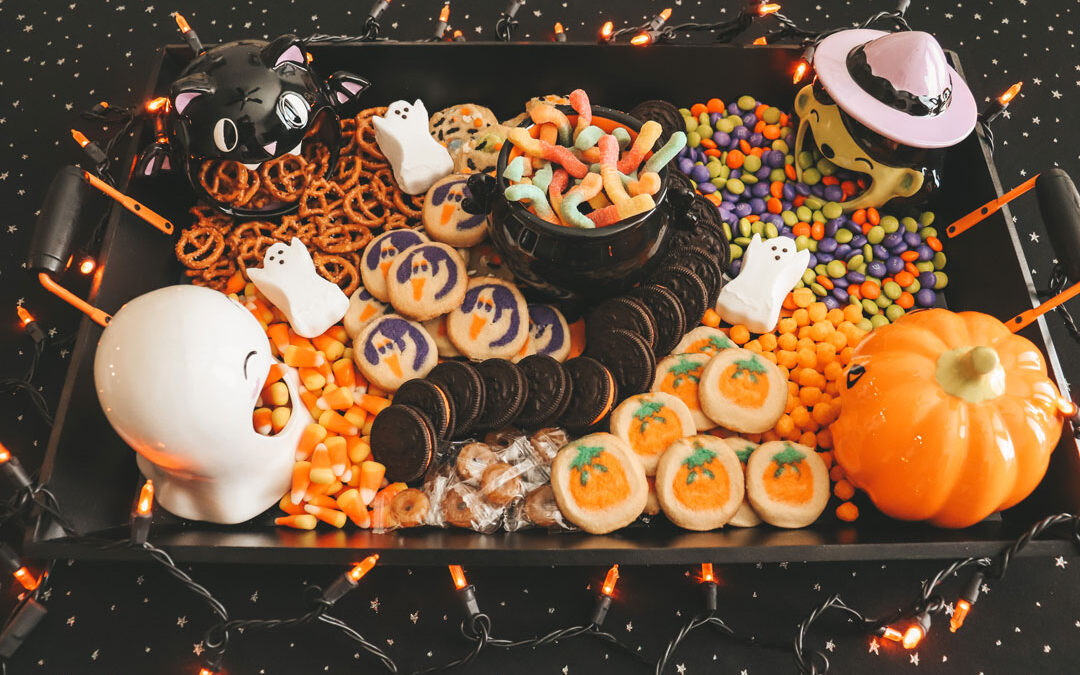
There’s nothing I enjoy more than arranging decadent boards full of snacks to share with my friends. The trick is combining the right flavors and ingredients that compliment each other and please a wide variety of taste buds. While a couple of my friends from college came to stay with us for the weekend, I decided to try something new and fun: creating a Halloween candy snack board!
It turned out so spooky and cute. It’s pretty easy to make a Halloween candy snack board, but sometimes arranging all of the treats or hunting down cute supplies might feel intimidating. Here’s my quick and easy step by step guide to help you create your own!
 \
\
Supplies for Your Halloween Candy Snack Board
Gathering up your supplies for this board is pretty simple: you just need some inexpensive Halloween decorations, and lots of candy! I found everything for my board at Target, but you could definitely find supplies at Walmart, Dollar Tree, or Five Below too.
To create a Halloween candy snack board, you’ll need:
- One Charcuterie Board or Serving Platter: I was going to just use a simple wooden board, but then I found this adorable Halloween tray at Target! I splurged on it for $20 because I know I will use it every year.
- Savory Snacks: I used Halloween pretzels and mini cheese balls. You could also use nuts, pumpkin seeds, ghost-shaped veggie chips, Cheeze-Its, Pringles, popcorn, or anything else you want.
- Sweet Snacks: I used Halloween M&Ms, candy corn, gummy worms, butterscotch Lifesavers, ghost Peeps, Halloween Oreos, and Pillsbury Halloween sugar cookies. The goal was to choose as many Halloween-themed treats as possible, with colors that would look nice together.
- Serving Bowls: To add some depth and texture to your board, add some little serving bowls to hold some of your snacks. I usually get mine from the Pioneer Woman section at Walmart, but for this spooky board I used candy dishes I’ve found for $3 at Target over the last few years. You could use simple plastic bowls from the dollar store, Halloween mugs, mini cauldrons, mini jack-o-lantern candy buckets, vintage candy dishes from Goodwill, or anything else you can find.
- Halloween Decorations: I kept it pretty simple with some orange lights from Target because I was so happy with the way my candy dishes looked. But you could totally use the inexpensive plastic toys people give to kids on Halloween, like spider rings, rubber bats, and vampire teeth.


How to Make a Halloween Candy Snack Board
Step 1: Gather up your supplies.
Don’t start assembling your board until you have all of your supplies on hand. If you leave the snacks sitting out, they will get stale. I grabbed everything I wanted to use from around my house first, then I went shopping for the rest of the supplies. Since we already had some of the decor, candy, and snacks on hand, it was pretty easy to stick to a small budget for the rest!
Step 2: Bake or prep ingredients.
If you’re using any ingredients that need to be baked in the oven (like cookies) or adjusted (like the ghost peeps I cut apart gently with a knife), do all of that prep work before you start laying stuff on your board.
Step 3: Start with big focal pieces.
When I assemble any kind of charcuterie or snack board, I find that it’s easiest to arrange things around the largest elements on the board. If you have some cute candy dishes or serving bowls, fill those up and place them first.
Step 4: Stack your stackables.
Normally for a regular cheese board, I use circular Carr’s crackers to create a kind of layered pattern in the middle of my board. I remove them from their package, keeping them stacked together. Then I lay that stack gently across the board and curve it around one of my serving bowls. When I created this Halloween candy snack board, I used Oreos to do this. It creates a really dramatic effect, and it separates sections of snacks from each other.
Step 5: Fill in gaps.
Once you have your serving bowls arranged and your Oreos stacked, you can fill in all the holes with your other snacks. Start with large pieces like sugar cookies. Then pour a few handfuls of your other treats like pretzels or M&Ms into open spaces. Place “statement snacks” like ghost peeps on top. Keep going until there are no more empty sections of your board.

Happy Halloween
I hope you enjoy creating a Halloween candy snack board for your next party! Happy haunting, and stay spooky!


FOLLOW ME